Archives

Project 365 – Sun Dried Tomato & Artichoke Heart Pizza

Having spent the last couple of days working on a rather ho-hum, boring, and altogether tedious (not to mention very draining) project, I found I had to pull tonight’s dinner and P365 photo out of a hat.  So, satisfying my kiddos with something much more palatable to their persnickety taste buds, I concocted this fabulously delicious pizza for myself.

I was too doggone tired and hungry to come up with a better image for today.   But for inquiring minds, and more particularly for my own future reference, I will share my “rough draft” recipe for this delicious pizza since I didn’t actually measure the ingredients when making my pizza.

Sun Dried Tomato & Artichoke Heart Pizza

2 t. olive oil
1/4 c. sun-dried tomatoes (I used dehydrated garden tomatoes, re-hydrated briefly in hot water and drained)
1/2 c. artichoke hearts, drained (I used Sam’s Club jarred artichoke hearts… not marinated)
pinch crushed red pepper
1 clove garlic, minced
splash of dry white wine
fresh mozzarella cheese
Parmesan cheese
1 small pre-made pizza crust (I make four small crusts from this recipe and then freeze: http://www.food.com/recipe/thin-pizza-crust-95048)

Pre-heat oven to 400 degrees.  Heat olive oil in large skillet on medium high heat.  Add tomatoes, artichoke hearts, crushed red pepper, and garlic.  Cook for 1-2 minutes. Add white wine and continue cooking for about 1-2 minutes more.  Remove from heat.  Top pre-made crust with mozzarella, tomato and artichoke mixture, and parmesan cheese.  Bake for 8-12 minutes until edges are golden.  Pour yourself a big, fat glass of white wine and chow down!  You’re welcome.  😀

DSC09929


Project 365 – Blue Cheese, Caramelized Onion, & Arugula Pizza

A P365 image of my amazingly delicious dinner tonight.  My pizza craving hit late in the day so I Googled “quick pizza dough”.  I found this recipe and I mixed it up, let it rise, rolled out the dough nice and thin, and grilled it on my stove-top grill pan.  Then I hit it with a bit of olive oil, caramelized onions, bacon bits, and blue cheese.  I tossed it in the oven and, when it was nice and hot and bubbly, I topped it with some arugula from the garden and a quick drizzle of fig balsamic vinegar.  Yummmm and eeee!!!!

DSC08516-Edit-Edit-Edit

Making A Basic Tincture

DSC00571 copyAh, summertime!  It’s my favorite time of the year, hands down.  I just adore the hot summer sun and nearly every conceivable summer activity.  Preserving the fruits of my garden labor is one of my very favorite summer activities.  I find it so rewarding and even therapeutic to make jams and jellies, can veggies, and freeze and dehydrate our produce.  It is really no wonder that discovering yet another way to preserve my garden harvest has me just as giddy as a school girl.  But tincture making really goes beyond just being a method of preservation, it’s a way to extract and concentrate the healing and beneficial properties of an herb and preserve them for a long time, often for many. many years.  Cool, huh?!

As is true with many of my adventures I share on my blog, I am about a green as a bean when it to working with herbs outside of a culinary setting.  But, as is also true, I absolutely LOVE learning new things so I am finding studying herbalism and all about the healing properties of herbs utterly fascinating!  But please, please understand that I am not a certified herbalist and I don’t play one on T.V.!  Don’t take my word as gospel when it comes to working with herbs and please do your own research and consult your doctor before making and using your own herbal medicines.  Herbs are powerful healers, but they can also be dangerous depending on your medical condition and dosages.  Okay, end of lecture.   Moving right along…

About a week ago I started my first tincture using one of my absolute favorite garden herbs: lemon balm.  I am really excited about using this particular tincture.  I often drink lemon balm tea at bedtime as I find it really helps ease me to sleep.  But I don’t necessarily enjoy the middle of the night bathroom run to relieve my swelling bladder.  My hope is that the lemon balm tincture will serve the same sedating purpose as my tea, but without the middle of the night potty run.  Though it’s still steeping away and not quite ready yet for the final step of straining off the plant matter, reading all about the helpful properties of so many of my garden herbs had me anxious to get busy starting more herb tinctures.  I began tackling my ever-growing list of herbs today and would have kept right on going if I hadn’t run out of vodka!

Lemon Balm Tincture

The first tincture on today’s to-do list, red clover, was actually not something I have growing in my yard, but rather something that grows all around me in the empty lots around my neighborhood.  I first started learning about this wonderful “weed” last year during my wine making research.  I had really hoped to make a red clover wine, but sadly missed the blossoming boat so it’s been in the back of my mind for quite a while.  When I read about it’s wonderful healing properties I just knew I had to tincture it!

My littlest helper and I didn’t have to go far to find enough blossoms for our tincture.  We had just what we needed in no time and came right home to prepare the blooms.

Olympic Games Opening Ceremony 2012

I wasn’t sure if the leaves and stems were acceptable for the tincture so, just to be on the safe side, we set about trimming them away from the blossoms.

Olympic Games Opening Ceremony 2012-15 copy

Once we had trimmed away most of the stems and leaves we put the blossoms in our mason jar.

Olympic Games Opening Ceremony 2012-5 copy

I had pre-measured 2 cups of vodka to cover the blossoms according to a recipe I was following, but found I needed to add a bit more to submerge them completely.  Mold and bacteria can develop and ruin a tincture if the plant matter isn’t completely covered.

Olympic Games Opening Ceremony 2012-6 copy

The only things left to do are label our concoction, shake the jars a few times a day to assist the extraction process, and allow it to steep for a few weeks before straining off the plant material.   It’s also important to “top up” with the alcohol as the plant matter expands or alcohol evaporates.  Yes, it really is that simple!  The healing properties of red clover are extensive but include helping with respiratory problems, cancer, cleansing the liver, cardiovascular health, treating colds, infertility, digestive problems, and skin issues such as acne and psoriasis.   Now that’s just super cool as most people just look at it as a lowly weed.  🙂  I am hoping I will have soon have time before the blossoms fade to gather more red clover to make a syrup and perhaps even enough to finally start a batch of red clover wine.

Olympic Games Opening Ceremony 2012-7 copy

For our next tincture I decided to tackle my chamomile.  I planted this last year, but sadly never did anything with it besides watch it grow and admire its beauty.  I was aware of its renown for its calming and soothing properties, but that was the extent of my knowledge.  But as is true of many herbs, the healing properties of chamomile are vast including being an anti-inflammatory, assisting with healing wounds, fighting colds, and soothing the stomach.

I particularly enjoyed the task of harvesting my chamomile blossoms.  Their petite, daisy-like appearance coupled with their sweet, somewhat earthy scent was balm to my very soul!  I couldn’t help but sniff and sniff the contents of my mason jar over and over as I collected the delicate blossoms.  No wonder there are always so many little critters flittering about these lovely plants!  They are utterly delicious and oh, so pretty!

Olympic Games Opening Ceremony 2012-10 copy

After collecting and sniffing, sniffing and collecting I covered them in vodka.  Aren’t they lovely?  I can hardly wait to try the tincture!  I plan to mix it with a bit of water, some lemon balm and lavender tinctures as a soothing bedtime sleep aid.

Olympic Games Opening Ceremony 2012-11 copy

So with two tinctures brewing I was on to the next!  My lovely lavender plants have been covered with blossoms for a couple of weeks and I was anxious to harvest some before they passed their prime.  So a few days ago I gathered a bunch and put them in my dehydrator.  Once they had dried I separated the buds from the stems, all the while taking full advantage of the free HBO and Starz  preview weekend on Dish!  Bonus!   When it was time to make my tinctures I had nearly enough from my harvest to make a full batch.  I added some purchased culinary lavender to my harvested buds and topped it all with vodka.

DSC00552 copy

Finally, my last tincture of the day was sage.  This poor herb is so infrequently used in my garden and yet grows so well that I was delighted to discover its many touted healing properties.   Useful for not only its antiviral, antiseptic, astringent, and anti-fungal properties, sage is also great for memory issues as well as a beauty aid.  Yep, they had me at “memory issues”!  I just gotta try this!

Olympic Games Opening Ceremony 2012-12 copy

I didn’t have to snip for long before I had all that I needed for my tincture.

Olympic Games Opening Ceremony 2012-14 copy

This last shot is of a few Plantain leaves I found while collecting the red clover blossoms.  This powerhouse herb that can be found just about anywhere as it’s one of the top three weeds found in yards everywhere.  It is a remarkable healer for all types of skin rashes, insect bites, cuts, bee stings and even snake bites!  I plan to go plantain foraging in the near future, but decided the best way to preserver these for now was to dehydrate them.  Once I collect more I plan to make a tincture and an oil to have at the ready in our first aid kit.

DSC00567 copy

With so many more healing plants growing in my garden and beyond, I am excited to learn more about them and how to use them not only for culinary purposes, but to begin understanding and harnessing their healing properties for myself and my loved ones.  Thanks for stopping by and feel free to leave comments below about your experience with the healing properties of herbs, tincture making, or using herbs as medicine.  Also, if you have any corrections or suggestions for my blog, please let me know!  I welcome your input.   Blessings!

Hrudka – Slovak Easter Cheese

SONY DSCSo, I’ve been feeling a bit of withdrawal in the cheese making department.  Other than making some 30 minute mozzarella and yogurt cheese, I’ve been too busy of late to mess around with my new cheese making hobby.  But when I saw an interesting post about hrudka, a fresh Easter cheese, I was intrigued.  It didn’t look terribly difficult to make or very time-consuming.  And with Easter just a few days away, I decided to give it a try.

Hrudka, also called sirok or sirecz, is a tradition during Easter time in Slovakia and is typically served with ham, kielbasa, beet horseradish, and paska (Easter bread).   It can be made either savory or sweet, but I opted to try the sweet version especially since I think my little one would probably prefer it.

The ingredients are simple and readily available, a dozen eggs, a quart of milk, 1 teaspoon of salt, and 1 cup of sugar.  Stay tuned as I also added another, super secret ingredient later because I just couldn’t resist!

SONY DSC

The first step is to break all the eggs into a large mixing bowl.

SONY DSC

Then I began breaking up the eggs with a whisk.

SONY DSC

But I soon switched to a fork as I just couldn’t get the desired “whisking action” with my whisk.  A fork just seems to do a better job of breaking up the eggs for me.

SONY DSC

Next, I added the milk and eggs to the pot.

SONY DSC

Then the salt…

SONY DSC

Sugar…

SONY DSC

And vanilla.

SONY DSC

With a low flame I began heating the ingredients.

SONY DSC

After about 10 minutes of smelling the delicious aroma coming from the pot, I felt a sudden urge to add another ingredient.  The aroma of the warming milk, eggs, sugar and vanilla just screamed out for the addition of cardamom!  Since I had never even tried hrudka let alone make it, I wasn’t really sure this was a good idea.  But I went with my gut and added it anyway, just 1/8 of a teaspoon.

SONY DSC

I read that the key to success with this recipe is not to scramble the eggs by using a too-high temperature, while also stirring constantly for 20-30 minutes.  I think I was a little overly conservative with the temperature as a result.  When I hit the 30 minute mark and things still hadn’t progressed much I began to wonder if I was doing something wrong.  The whey was suppose to begin to separate and curds were suppose to appear.  I just wasn’t getting that.

SONY DSC

At about 40 minutes I decided to put the mixture in my cheese bag to see if any whey would drain.  After about 20 minutes this was all I had collected.  I had my doubts about whether I had done things quite right, so while the whey slowly dripped I did a little more research on making hrudka.

SONY DSC

In the end I decided to put the mixture back in the pot and cook it some more.  This time I threw caution to the wind and cranked the heat up to medium!

SONY DSC

And voila! My whey suddenly started to separate and curds appeared!  I guess I was just too cautious about heating the mixture for fear I would have nothing but a big pot of sweetened scrambled eggs.  The next time I make it I will know better.

SONY DSC

So back into the cheese bag it went and now I had some serious draining going on.  If you look closely you can see the stream of whey flowing from the bottom of the bag.  Much better!

SONY DSC

So after a couple hours of draining and periodically squeezing the cheese bag, here’s what we ended up with.  Looks pretty good, I think, and it tasted really interesting.  It was much like a solid, mildly sweet custard.

SONY DSC

I chilled it in the fridge overnight and then it was time to dive into it for breakfast the next morning.  I cut a few slices…

SONY DSC

And browned up some butter in a small frying pan.

SONY DSC

I wasn’t sure if the cheese would melt, but I read that it could be fried and that sounded really good to me.  So into the pan the slices went.

SONY DSC

I cooked them for a few minutes on medium high and then flipped them over.  They held their shape perfectly!

SONY DSC

I served some up for my little one with a drizzle of maple syrup.

SONY DSC

But I decided I’d like to try mine with a sprinkle of powdered sugar.

SONY DSC

Oh boy, they were delicious!  They were lightly sweet with a hint of the warm flavor of cardamom coming through.  It was much like eating french toast but with a different texture.

SONY DSC

It is easy to see why this is an Easter tradition in some countries.  The distinctive flavor of the cheese is something I am sure I will soon begin to crave.  And the ingredients just call out to be experimented with!  Some people add cinnamon instead of vanilla, but others simply add salt and no sugar for a savory version.  Personally, I love cardamom so I expect that will be my favorite spice to add to the sweet version.  But I have to wonder what it would be like to add fresh herbs to a savory version.  Hrudka is often served on ham sandwiches so I think the addition of fresh herbs might be nice.  I may try that sometime, but I’d really love to hear from you.  Have you ever had hrudka?  If so, how was it served?  And if mine isn’t right, please do tell!  I was really flying blind with this recipe, but I am happy with the results it may very well become an Easter tradition in my house too!

Orange & Ginger Baby Bundts with Maple Glaze

SONY DSCThis week I am back to cake recipe inventing.  I am really enjoying learning more about the why’s and how’s of baking and recipe building, but I admit I do find it all rather overwhelming.  My admiration for pasty chefs continues to grow the deeper I dive into my baking adventure.  The more I learn about baking chemistry, the more certain I am I will never be a pastry chef.   I shall never again watch another episode of Food Network Challenge the same way!  I am in awe of what they do!

The inspiration for this latest recipe came in my mailbox.  I was excited to discover the March 2013 issue of Saveur Magazine was all about donuts!  But it wasn’t the donut recipes that had me so excited.  It was the glazes for the donuts!  It occurred to me that I could use these decadent looking recipes to dress up my baby bundts.  Yay!  The recipes all look so incredibly fabulous: Dulce de Leche Glaze, Amaretto Cherry Glaze, Irish Cream Glaze, White Chocolate Cardamom Glaze, Marshmallow Glaze… My mouth was watering as I gazed upon the incredible glazes!  There were over a dozen fabulous glaze recipes and each and every one has already been added into my cookbook software.

But it was the maple glaze recipe really caught my eye.   I recently purchased a number of Boyajian oils and flavorings for my cake recipes, and maple was among the newest of the flavors to hit my pantry.  I was itching to try it out.  So, with the first flavor component in mind, I consulted my trusty Flavor Bible for other complimentary flavors.  There, among all the flavors listed were orange and ginger.  Bingo!  Ginger was already in the fridge and I had a brand spanking new bottle of orange oil in the pantry.  Perfect.

The next stop was the web site I have been using to develop my recipes.   I put together the recipe and got to work.  I gathered the ingredients and grated the ginger.

SONY DSC

First, I creamed the butter, then I added the sugar and beat it until it was light and fluffy.

SONY DSC

Then I added the egg yolks and egg one at a time, beating between each addition.

SONY DSC

Next, I added the grated ginger and orange oil and mixed well.

SONY DSC

I sifted the dry ingredients…

SONY DSC

And mixed up the buttermilk.  I love having dehydrated buttermilk on hand.  I almost never have real buttermilk so I always keep a container of Saco buttermilk in the fridge.  Just mix it with water and, voila!  Instant buttermilk!

SONY DSC

Then, alternating the dry ingredients with the buttermilk I incorporated it all into the batter.

SONY DSC

SONY DSC

My original recipe started with half a cup of buttermilk, but ended up adding an additional 1/4 cup to thin the batter a bit.   I was a bit concerned that this might ruin the cake, but the batter seemed a little too thick so I took my chances.

SONY DSC

Here it is after I thinned it.

SONY DSC

I like working with small batches for my test recipes in case the recipe is a disaster.  This one filled almost 2 baby bundt pans.

SONY DSC

I used my convection bake feature and baked these on two different shelves.  The bottom shelf baked faster and I ended up taking it out at 11 minutes.  The cakes were browner than the top shelf pan, perhaps due in part because the pan was only partially full of batter.

SONY DSC

Here they are cooling on the counter.  The ones in the back were baked on the lower shelf.

SONY DSC

While these cooled I mixed up the glaze.

SONY DSC

I just dumped all the ingredients in a bowl and whisked them together.   I deviated from magazine recipe by using half and half instead of whipping cream because I didn’t have any on hand, and adding 1/2 teaspoon of maple flavoring, 1/4 tsp at a time.  The glaze didn’t have quite enough maple flavor to my liking so I decided to try the maple flavoring (or maybe it was just an excuse to use my new flavoring 🙂 ).  Now that the glaze has had a chance to sit a bit, I think 1/4 tsp would have been enough.

SONY DSC

It took all of my will power to wait to eat this until after I snapped the photos!  I thought the cake really was good.  I think it was the right move to add the additional buttermilk although I think I will adjust the final measurement down a bit because I did have some difficulty getting a couple of the cakes out of the pan in one piece (you wouldn’t know that from my photos because I ate the evidence!)

SONY DSC

This recipe is getting moved from my “Test Recipe” cookbook into my keeper recipes.  I loved the combination of orange, ginger and maple.  I would love to hear from you if you try my recipe or if you’re an experienced chef.  I would love to have your feedback, good and bad, so I can make improvements wherever possible.  Thanks for stopping by!

Orange Ginger Cake with Maple Glaze

1 1/2 cup flour
1 cup sugar
1 eggs
2 egg yolks
1/2 cup butter (1 stick)
2/3 cup buttermilk
2 tsp fresh grated ginger
1/4 tsp orange oil (or 1/2 tsp orange extract)
1 1/2 tsp baking powder
1/4 tsp baking soda
1/4 tsp salt

1. Preheat convection oven to 300 or regular oven to 325.

2. In a small bowl sift together dry ingredients.

3. Cream butter then add sugar and beat until light and fluffy.

4. Add egg and yolks one at a time, beating after each addition.

5. Add grated ginger and orange oil and mix well.

6. Beginning and ending with the flour, mix 1/3 of the flour into 
the wet mixture at a low speed, then 1/2 of the milk, alternating 
until all ingredients are mixed.

7. Fill prepared baby bundt pans 1/2 full with batter.  Tap pan on 
counter several times to release air bubbles and even out batter.  
Bake in convection oven for 11-13 minutes or until toothpick inserted 
into cake comes out clean.

8. Cool cakes for 10 minutes and then invert onto a cooling rack.

9. Cool completely.  Top with maple glaze and enjoy!

Maple Glaze (I halved this recipe since it was a small cake batch)

2 cups confectioners' sugar
1/3 cup maple syrup
1/4 tsp maple flavor
1/4 cup heavy cream
1/8 tsp kosher salt1. 

Whisk sugar, syrup, cream and salt in a bowl until smooth.

Valentine’s Day Projects From the Studio and the Kitchen

SONY DSCIt’s Valentine’s Day here and I have been busy making all sorts of fun things for my family and my little one’s classmates and teachers.  Now lest you think I am Wonder Woman, I must say I didn’t do all of this today.  I’ve been working on this over the past week and wrapped up the last task, a most delicious one, after spending most of the day working on my dratted taxes.  I can’t think of a better way to unwind after that unpleasant task than dipping strawberries and pretzels in chocolate!  Yum!

My little guy had his very first Valentine’s party at preschool this week.  He was so excited, though I don’t really think he knew what a Valentine’s party was all about.  But we had a great time selecting the treats and making the treat boxes and Valentine’s for each of his classmates.  You can’t see it in the photo, but we had a different Angry Bird character on each of the little Valentine cards.  I printed them up, but my little one colored them all by hand!  Don’t you just love the little french fry boxes?  I found the svg file online and cut these using my digital cutter.  I used some Stampin’ Up! punches for the hearts and tag.

SONY DSC

For his teachers I made a special coffee mug and some really delicious Vanilla Orange Instant Cappuccino.  I plan to do a post with the recipe in the near future as it is out of this world yummy!

SONY DSC

This adorable Valentine’s card idea came from Pinterest.  I totally cheated and copied the design concept for the front of the card!  I used Photoshop to create the card and my Big Shot to emboss the background.  I love the font for this card!  There are tons of fabulous handwriting fonts here.  I am addicted to downloading fonts and this is one of the best sites I’ve found for fabulous FREE fonts!

SONY DSC

Here’s a look at the inside.

SONY DSC

And the back…

SONY DSC

And a close-up…

SONY DSC

Here’s what was waiting for my sweet Valentine’s when they returned from school: Chocolate dipped strawberries and pretzels and a Valentine’s card.

SONY DSC

I can’t think of a better way to show my family how much I love them than with some delicious handmade treats!

SONY DSC

I hope you have a blessed Valentine’s Day and are able to spend it with the ones you love most!

Lime Baby Bundts With Strawberry Jalapeno Jam and Lime Buttercream Frosting

SONY DSCI am on a baby bundt baking roll!  I had an idea for a flavor combination that I couldn’t get out of my head, and although this recipe won’t make it to my parent’s 50th anniversary party, I think it might be a winner!  I need to make some minor tweaks to the recipe, but I really thought all the flavors worked together.  I think I will probably pursue a regular strawberry cake recipe for the party because my mom adores strawberries, but I can tell you I did not acquire my love for all things spicy from her.  Even though the jam really doesn’t have any heat to it (at least not that I can tell, though my heat seeking taste sensors might be dulled due to a lifetime of enjoying the spicier side of life) my dear mother would be less than thrilled to have her beloved strawberries accompanying a pepper in any form.  But alas, with so many jars of strawberry jalapeno jam left on the pantry shelf it is time to start figuring new ways to use it.

I am getting more daring with my creativity and trying to come up with my own cake recipes.  I really want to understand the science behind baking a bit more than I do.  So this recipe, good or bad, is my own.  I did have a couple missteps along the way, but in the end I think I have something I can work with.  I doubt I will get to play around much with this recipe for the foreseeable future as I need to solidify the dessert plan for my parent’s party, but hopefully I can try again and report back before too long (or maybe YOU might like to try my modified recipe and report back to me! 😉 .  I will give you the step-by-step of what I did and then I will finish with what I think the recipe should be next time.

So first I creamed 3/4 cup of unsalted, room temperature butter.

SONY DSC

Next, I added 1 3/4 cups of sugar and creamed the mixture again.

SONY DSC

Then I added 3 room temperature eggs one at a time, blending well between each addition.

SONY DSC

I zested a lime…

SONY DSC

 And I added it to the batter along with 1 tablespoon of lime juice and 1 teaspoon of vanilla extract.

SONY DSC

Then I sifted together 3 cups of all-purpose flour, 1 teaspoon of baking soda, 1 teaspoon of baking powder, and 1/2 teaspoon of salt.  This is where I think I made one of my missteps.  I think there is a problem with the baking soda and baking powder combinations.  I think next time I will try either 2 teaspoons of baking powder or 2 teaspoons of baking soda. (If you’re a baker and have any thoughts here I’d love to hear them!)

SONY DSC

Next, I mixed in the dry ingredients alternating with 1 1/2 cup of homemade plain Greek yogurt starting and finishing with the dry ingredients.  I think I should have used milk as part of my liquid ingredient here.  Next time I plan to use 1 cup of yogurt and 1/2 cup of milk.

SONY DSC

The batter was a bit too thick when I finished adding all the ingredients, but I went ahead with one batch anyway just to see how they turned out. Here’s what the batter looked like after I mixed in all the ingredients.

SONY DSC

The cakes puffed up pretty quickly.  I am not sure if that is because I overfilled the pan, or if the batter was too thick, or perhaps the baking soda and baking powder had something to do with it.  The also cooked really fast and browned around the edges more quickly that my other cakes have.  I was using my convection oven at 325, but I turned it down to 310 degrees as soon as I noticed the problem.  Here’s what they looked like while baking.

SONY DSC

So to try to remedy the problem with the batter, I decided to add 1/4 cup of milk.  I was pretty nervous that I was going to mess up the rest of the batter, but the first batch just didn’t have the right look or feel to them.  The outside of the cakes were a dry, crumbly texture probably due to the fact that the batter didn’t have enough moisture.  I tried to gently fold in the milk so as not to over mix the batter.

SONY DSC

The next batch of cakes came out much better!  I forgot to take a photo, but you can see the end result from the dressed up cake at the top and bottom of the post.

While the cakes cooled I creamed 1 stick of room temperature butter with 1 tablespoon of key lime juice and 1 tablespoon of milk.

SONY DSC

Then I added 2 cups of powdered sugar and just a touch of neon green food coloring (because I didn’t have any regular green on hand).  I was lax about taking photos at this point.  Sorry.  The frosting was a very pale green which was just the way I wanted it.  The flavor was okay, but I am not sure I loved the key lime juice.  I used it because I had a bottle and I thought key limes were supposed to taste better than regular limes.  I really think I am going to use Lorann lime oil the next time I make this.  I really love using Lorran oils for flavoring when I am making baked goods.  I just find the flavors to be spot on.  This frosting just wasn’t quite “perfect” for me.

Here’s my favorite little kitchen helper getting a peek into the mixing bowl as I worked.  Yes, he was rewarded with a sample… or two.  🙂  (Please don’t mind the pizza sauce on his cheek.  It was leftover from his grilled pizza sandwich he had for lunch.)

SONY DSC

Once the cakes were cool, I used a baby spoon to insert the homemade strawberry jalapeno jam into the cake cavity.  Then I put a little frosting in small zippy, snipped a tiny bit off one corner and piped it on top of the cake.

SONY DSC

So, there you have it.  That’s what I did and now here’s how I plan to make it next time.

Lime Baby Bundt Cakes with Strawberry Jalapeno Jam and Lime Buttercream Frosting (A work in process.)

Cake Ingredients: 
1 cup Greek yogurt, plain
1/2 cup milk
3/4 cup butter, softened
1 3/4 cups sugar
2 Tbs lime zest
3 eggs
1 tsp vanilla
1/2 tsp Lorann lime oil (or 1 tsp lime extract)
3 cups all-purpose flour
2 tsp baking powder
1/2 tsp salt

Frosting Ingredients:
1 stick of butter, room temperature
1/2 tsp Lorann lime oil (or 1 tsp lime extract)
1-2 tbls milk
2 cups powdered sugar

1. Preheat convection oven to 300 (or a regular oven to 325 degrees). Grease and 
flour mini bundt pans or spray with baking spray.

2. In large bowl beat butter until creamy, about 2 minutes. Add sugar and beat at 
medium speed for about 2-3 minutes.

3. Beat in eggs, one at a time, beating well after each addition. 

4. Add lime zest and lime oil and mix well.

5. In medium bowl, combine flour and baking soda and baking powder, and salt. Sift. 

6. In a small bowl, combine yogurt and milk until well blended.

7. Gradually add dry ingredients and yogurt/milk mixture to butter mixture, beginning 
and ending with flour mixture.

4. Pour into prepared mini bundt pans, and bake for 13-14 minutes, or until a wooden
pick inserted in center comes clean. Let cool in pans for 10 minutes. Remove from 
pans, and cool completely on wire racks.

5. While the cakes are cooling, cream the butter for the frosting. 

6. Mix lime oil, milk and powdered sugar into the butter, adding just enough milk to make 
the frosting light and fluffy.7. When the cakes are completely cool fill each cake cavity with 1 1/2 teaspoons jam and top 
with buttercream frosting.
Enjoy!

Banana Coconut Cardamom Cake – Mixed Review

SONY DSCSo lately I’ve been on this mini bundt cake kick.  My siblings and I are in the midst of planning our parent’s 50th wedding anniversary party and I have volunteered to make the desserts.  I am not exactly sure what possessed me to sign up for this, and I admit I am rather nervous about the whole thing, but I am having a fabulous time testing recipes.  I recently purchased some mini bundt pans and I been playing around with some fun recipes for the past couple of weeks.  I have seriously never had so much fun baking cakes in my life!  And the petite little cakes are just so stinking cute!

Baking baby bundts has opened up a whole new world of creativity for me.  (I know, like I needed another one.)  There is just something about baking these little gems (and eating them) that is just so fun.  And I must say that the cakes I’ve made in the last couple of weeks are among my all-time favorites.  Sadly, I didn’t document any until now, but rest assured I will… eventually.  My favorites were the Orange Cardamom cake and the Ginger & Lemon cake.  Oh, my!  So good!

Today I decided to experiment with some new flavor combinations.  I poked around my pantry to see what I had on hand and I grabbed my trusty Flavor Bible.   (If you don’t have this book and you like to experiment with different ingredients, I cannot recommend this book enough!  It’s one of my top favorite cookbooks, though it’s not really a cookbook at all.  It’s more of an encyclopedia of ingredients.  If you ever wanted to know what flavors compliment pistachios or salmon, for example, this book is the book for you.  It really is worth its weight in gold.)  Finding some overripe bananas during my kitchen exploration, I decided this would be my first flavor component.  I consulted my trusty Flavor Bible and discovered coconut and cardamom both compliment banana beautifully.  I had a can of coconut milk in the pantry and I wouldn’t even think of being without cardamom as it’s one of my absolute favorite spices.  So the flavor profile was in place.  I just needed to get the recipe figured out.

When I started down the baby bundt baking path a couple weeks ago I discovered a terrific book called Kiss My Bundt.  After reading the reviews I knew I had to have it.  I purchased the Kindle version and I absolutely love it!  The Orange Cardamom cake and Ginger Lemon cakes, that I believe my be among the best cakes I’ve ever made, were also adapted from Ms. Wilson’s book.  She really sort of demystified the whole cake baking process for me.  I love how the author explains the why’s and how’s of cake baking and exchanging ingredients in a recipe to come up with your own recipes.  So I used the Banana Cake recipe from Kiss My Bundt as a guideline and added a couple of my own twists.  Instead of using whole milk like the recipe called for I used coconut milk, as well as an extra half teaspoon of vanilla, and a teaspoon of cardamom.

The resulting cake was really quite good.  I really like the hint of coconut flavor, and the cardamom added a unique twist to ordinary banana cake.  So then I started thinking about how I would dress the cake further.  I decided to go with a cream cheese glaze.  Sounds pretty good, right?  But I couldn’t leave well enough alone just go with a traditional cream cheese glaze.  No, I had to add one more creative twist to my banana cake adventure.  With just a few tablespoons of coconut milk still left in the can, I got the brilliant idea to swap the milk for coconut milk in the glaze.  Pure brilliance, right?

Okay, not so much.  I can’t quite put my finger on what I didn’t like about it, but I just didn’t like it.  The cake by itself was pretty good.  I’d probably give it maybe 3.5 stars.  But the addition of the coconut glaze sort of ruined it for me.  But, well what can I say?  I tried.

So, take the rest of this post with a grain of salt.  If you’re into trying a new banana cake recipe, go for it!  But I’d probably suggest a plain cream cheese glaze or better still, a buttercream frosting.  I think the buttercream frosting would put this cake into a 4-5 star rating in my book.

Okay, here we go….

The ingredients.  (Check out my homemade vanilla in the big bottle between the sugar and flour.  That is some seriously good stuff and a first for me.  Perhaps a blog for another day…)

SONY DSC

I creamed the softened butter for a few minutes and then added the sugar and creamed it a bit more.

SONY DSC

Next, I added the vanilla and the eggs.

SONY DSC

I measured out the dry ingredients into a separate bowl.

SONY DSC

Yes, I seriously did sift the dry ingredients.  I don’t think I have ever done this before when making cakes until the last couple weeks.  But hey, 50 years of marriage is serious business!

SONY DSC

And into the mixer it went.  I alternated between mixing the dry ingredients and the coconut milk.

SONY DSC

Next,  the bananas.

SONY DSC

My creative juices were seriously going full throttle today.  Since I purchased my mini bundt pans a few weeks ago I’ve struggled with getting the batter into the pan nice and neat and tidy.  Invariably I had a big sloppy mess of batter all over the pan so I decided to try a new method today.  I put all of my batter into a big zippy, snipped a bit off the corner, and piped it into the pan.

SONY DSC

The verdict?  Well, it worked out quite nicely actually.  I was able to get most of the batter where it was supposed to be and I had better control over filling each well with the right amount of batter.  It wasn’t perfect, but it was the best method I have found as of yet.

SONY DSC

All that white stuff on the pan is flour.  I keep forgetting to pick up a baking spray at the grocery so I am using my Misto and a Pampered Chef duster to prepare my pan.  Just pretend you didn’t see the cakes in the background.  I didn’t think to take this shot until they came out of the oven.  So much for the big reveal.

SONY DSC

I just have to mention that I am finally getting around to learning how to use the convection bake option on my oven.  I was so excited to have this available to me when we built our house, but I never took the time to learn how to use it.  But if I am going to be baking 14 kajillion cakes and cookies for this party I decided I better get it figured out.  It’s so cool!  I can bake two pans at once on a lower temperature and for a shorter amount of time than my conventional bake option and they bake quite evenly!  Love it!   (My first two pans were already cooling on the counter and I was finishing up the last of the batter so that’s why there aren’t two pans pictured here.)

SONY DSC

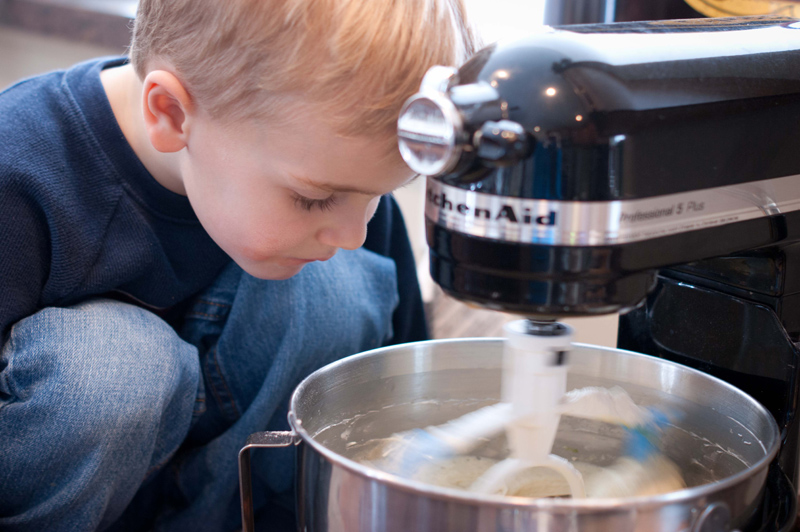
Now, can I get a drum roll for the best photo of the day?  While the cakes were baking my little one decided he needed to get in on the photo action too.  He grabbed daddy’s phone and started snapping tons of photos of the cakes baking!  Priceless!

SONY DSC

Ta da!  The big reveal. Oh, yeah.  I already ruined that moment.

SONY DSC

I took some photos of the glaze making process, but I won’t bother sharing those as I just can’t recommend the glaze.  I think the cake is really tasty, but it still lacked a bit of something.  The banana cake recipe from Kiss My Bundt recommended adding a bit of banana extract, but as I didn’t have any on hand I went with 2 bananas per the author’s recommendation instead of just one.  Still it just didn’t quite get it and I do think the banana extract might be the key with the cake recipe.  Also, I really do think the cake would be really delicious with a big dollop of buttercream frosting.  I will probably try that some day, but for now there are just too many other flavors to experiment with before the big day in June!

So, my take-aways for today are:

 1. Swapping the milk for coconut milk was an interesting choice but maybe I will try something like Greek yogurt or sour cream next time.

2. Adding cardamom to banana cake is a must… like always!

3. Using a zippy to pipe the batter into the pan is a splendid idea.

4. Taking too many creative leaps at once might spell disaster!

And now for the recipe as adapted from Kiss My Bundt by Chrysta Wilson:

Banana, Coconut & Cardamom Cake

Ingredients:

2 1/2 cup flour
2 1/2 tsp baking powder
1/2 tsp salt
3/4 cup unsalted butter, room temperature
1 3/4 cup sugar
1 tsp cardamom
3 eggs, room temperature
1 tsp vanilla
1 1/4 cup coconut milk
2 overripe banana, mashed

Procedure:

1. Preheat oven to 350 degrees.
2. In a medium sized bowl sift together flour, cardamom, baking powder and salt.
3. Cream the butter with an electric mixer until soft, about 2 minutes.
4. Add the sugar slowly to the butter and continue beating until it’s light and fluffy.
5. Add the eggs one at a time incorporating after each addition. Once the eggs are incorporated, continue beating for about two more minutes.
6. Add vanilla.
7. Beginning and ending with the flour,  mix 1/3 of the flour into the wet mixture,
then 1/2 of the coconut milk, alternating until all ingredients are mixed.
8. Gently mix bananas into the batter.
9. Transfer batter to cake pans that have been greased and floured and fill to about ½ to ¾ full.
10. Bake baby bundts for about 17 minutes in a regular oven, or at 325 degrees in a convection oven for about 14 minutes.  A toothpick inserted into the cake should come out clean.
11. Invert cake(s) onto a cooling rack or serving plate.
If cake resists, cool in the pan for 15 minutes before inverting.
(If cake still resists, cool an additional 15 minutes in the pan.)

Finally, after the cakes have cooled top with your favorite frosting
or glaze and enjoy!

Shrimp Quesadilla With Homemade Monterey Jack Cheese

SONY DSCWell, between the usual holiday rush in the shop and the busyness of the holiday season, as well as a very special project I am working on (sorry, this is super secret stuff that I cannot divulge until a later date 😉 ), I’ve had little time to spend blogging about my creative adventures.  But I wanted to add a quick post as a sort of update to my cheese making endeavors.

A little while back I played around with cheese making and much to my surprise I concocted some really amazing cheese.  One of my very favorites was my homemade Monterey Jack cheese.  After vacuum sealing my handiwork and tucking it away for a couple of months I decided it was time to open it up and give it a try.  I must say that I was completely floored with the results!  When I bit into my homemade cheeses I really couldn’t believe I had actually made them myself!  I am no cheese connoisseur, but even my friend preferred my homemade cheese to the fancy-schmancy local grocery store cheese shop cheese I served for our cooking group.  🙂  (Of course there is that possibility that she was just flattering me, but let’s not go there.)

Tonight I decided to try my Monterey Jack cheese in some shrimp quesadillas.  The recipe was super simple to put together.  First, I cut up some peppers and onions and sauteed them in a bit of oil.

SONY DSC

Once the peppers and onions had cooked through and the onions were translucent I added the shrimp.

SONY DSC

I cooked this for a few minutes until the shrimp was nice and pink.  I tossed in a teaspoon of cumin, a teaspoon of chili powder, a bit of lime juice, and some sea salt.

SONY DSC

Once this was all heated through and nicely incorporated, I removed it from the heat.  Then it was just a matter of building the quesadillas.  A flour tortilla topped with a bit of cheese, some of the shrimp and veggies, some more cheese (just for good measure)…

SONY DSC

Topped with another tortilla and grilled to perfection.  (Okay, well maybe a bit over perfection, but it was still delectable.)

SONY DSC

The only thing left to add was a dollop of Wholly Guacamole and Salsa, which was just .49 with a fabulous coupon deal at Kroger last week.  Score!

SONY DSC

Let me tell you, this was one quick and tasty dinner!  I am not sure when I will have time to try my hand at some more cheese making, but I am buoyed by my success and I hope I can try making more sometime soon.

Muenster Cheese

As I begin to stretch my cheese making wings and attempt other more complicated cheese recipes, I came across a rather simple looking recipe for Muenster cheese.  I was already experienced with nearly all of the steps involved and the added bonus was the fact that the cheese would be ready for consumption in as little as 5-7 days once out of the cheese press.  That’s about as close to instant gratification as you’ll get with most of the hard cheeses I have come across.  And as my “cheese cave” is nearly bare, housing only a Farmhouse Cheddar and Poblano Pepper Jack each requiring several more weeks of aging before they will be ready for consumption, this seemed like the perfect recipe to try next!

Disclaimer: Now as I share with you how I made the cheese please keep in mind that I am a novice when it comes to cheese making.  If you’re new to cheese making like I am, please don’t take anything I share as the gospel when it comes to making cheese.  You’ll want to invest in a cheese making class or do it the way I am: check out some books from the library, watch lots of YouTube videos, and read all about it on the Internet.  Cheese making is an art form and, as with any craft, practice (and in the case of cheese making in particular) and precision are key.  I don’t expect all of my cheeses to be raging successes, but I am thoroughly enjoying the challenge and new adventure I have just embarked upon!

The Muenster recipe I used came from a book I checked out of the library called Making Great Cheese At Home by Barbara Cilette.  It looked a bit easier than the recipe in my 200 Easy Homemade Cheese Recipes book so I thought I would try the easier version first.  Also, the more complicated recipe called for an ingredient I don’t have so it was really a no-brainer.

For this recipe I used 2 gallons of whole milk from the grocery store, though I would gladly have gone with 3 or 4 gallons had I a larger pot.  Since cheese making can be rather a long process start to finish, it makes sense to make the largest cheese wheel possible for the time invested, depending on the cheese of course.

I began warming the milk over a low flame on my gas stove.  I should mention many of the recipes call for warming the milk in a double boiler while a few do not.  At this point I am attempting to make my cheese without the use of a double boiler for simplicity sake.  I am blessed to have a gas stove with a simmer burner, which allows me to gently and slowly warm my milk.  If I had an electric stove I think a double boiler would be essential.  So far I have made a few successful batches of cheese using my simmer burner taking care not to heat the milk too quickly.  But ultimately I may find that the quality of the cheese will be improved with the use of a double boiler and perhaps I will decide to make a change.

While the milk was warming I prepared the rennet tablet by dissolving it in 1/4 cup of cool bottled water.  Tap water is a no-no as it often contains contains chlorine and that can interfere with the coagulation of the curds.

After frequently stirring and slowly warming the milk I finally reached the target temperature of 88 degrees.

At this point I turned off the heat, covered the pot and let it sit for 5 minutes.  After the 5 minute rest period I gently stirred in the rennet solution using an up and down motion.  I covered the pot again and let it sit, undisturbed for one hour.

When the hour was up, I made sure I had a clean break before cutting the curds into 1 inch cubes.

Here’s what the curds look like as I began stirring them.

The directions called for the addition of four teaspoons of salt (I used cheese salt) at this point and, although the other recipes I have tried called for adding the salt after all of the whey was strained and just before pressing, I went ahead and added it at this point anyway.  Next time however, I will wait and add the salt to the strained curds for a couple of reasons.  First, I like to make ricotta with the whey and I prefer the ricotta to be unsalted in case I want to use it to make something sweet.  Also, I think I lost much of the salt to the whey in this batch of cheese because the curds tasted very bland when I sampled them after straining the whey.  I ended up adding more salt to the strained curds before adding them to the cheese mold.

At this point I had a some trouble with the recipe directions so I had to wing it a bit.  The directions said to turn the heat back on and begin gently heating and stirring the curds.  Unlike the other recipes I have tried, I wasn’t given a temperature I was shooting for so I just warmed them slightly as the whey began to release from the curds.  The directions also said to mat the curds together with the spoon or my hands, but they never came together for me in the pot, perhaps because they weren’t heated enough.  I don’t know.  I was more afraid of overheating the curds so I decided to err on the side of caution and proceed with straining the curds.  Here’s what they looked like just before I decided to drain them in my cheesecloth lined colander.

Using a large slotted spoon I scooped most of the curds into the cheesecloth and then carefully dumped the rest.

This is what the curds looked like after about half and hour of draining.  I mixed in a bit of salt before transferring them to the cheese mold.

So then I gathered up the ends of the cheesecloth and plunked the lot into my cheese mold.  It was time for the first 12 hour pressing at 40 pounds of pressure.  Since I don’t yet own a cheese press I had to rig up my own press.  What do you think?

Actually, this is my second rigged press for the Muenster cheese.  My first one toppled over at about 3:30 a.m. jarring me awake.  Not good.  I lost about half a canister of bread flour and had a bit of a mess to clean up.  This is my first homemade cheese that required a significant amount of weight and it was a bit more difficult coming up with the required 40 pounds of pressure than I anticipated.  There are probably about a zillion better ways to do this than how I have it rigged, but fortunately this one worked for the remainder of the pressing time.

  I considered making my own press or even trying to use barbell weights as many home cheese makers do.  But as I don’t own any barbell weights and the cost to purchase them is nearly the equivalent of purchasing a new cheese press off Ebay I figure I’ll opt for the latter option eventually.  In the meantime I’ll work to create a better mouse trap so to speak. 😉

So after the requisite 24 hours of pressing, here is my beautiful work of culinary art hanging out of the drying mat!

The final step of this particular recipe is to lightly salt the cheese on all sides and allow it to dry on the cheese mat for a few days, flipping it a couple times a day.  Although I decided to stick with the original recipe to finish my first Muenster cheese with a salt rub, I have seen other recipes that call for brining the cheese with a saltwater solution and even one with a wine solution!  I have a terrific homemade Chardonnay that I think would make the perfect brine for this cheese!  Hopefully I will get a chance to try that in the coming weeks.

So now I wait.  And even if I missed the Muenster mark due to the hiccups along the way I have no doubt the cheese will be edible, perhaps even delightful!